How To Install Sign Letters like a Pro!
We have created many individual pages that cover the installation of varied types of sign letters and the mounting hardware available.
Interior or Ground Level Installs
For most end users, installing sign letters at ground level is one of the easiest DIY projects that can be done. Most sign letter installations consist of some form of glue along with a drill and an installation pattern to keep everything properly spaced and aligned. In the past, these install patterns were quite expensive and sold separately as an addon to your purchase but thankfully today they are included with most purchases.
Below are several install links by mount type used primarily for simple interior or exterior ground level installations
Cut Plastic Sign Letters
Formed or Cast Sign Letters
Cut Metal Sign Letters
Above Ground Installs
Above ground level things can get interesting but still doable. Yes you could just call in a local sign company with all the equipment to do the work or you can rise to the challenge and rent either a scissor lift or a man lift. You will still save a ton of money by doing your own install because you are buying from us the very same sign letters that the sign company uses. A little known secret is that for the large part, nobody makes their own letters. They buy them from the same manufacturer we do and the only difference is that they will charge you a lot more for them because they can! We encourage everyone to get a local sign company quote so they can compare with the price we sell them for.
Above ground installs require calm weather. If you are mounting individual letters you will first need to secure the pattern to the wall. Before you do that you will need to create a line on the wall that it level. You will use this line to place the bottom of the install pattern which you must secure to the wall without it being deformed or crinkled. One trick to do that is to first secure the pattern to stiff cardboard and punch holes through the card at every stud location. That makes the pattern easier to handle and less likely to fold or blow away. Once the hard part is done you are ready to mark through the pattern to the wall with a stout hammer and center punch. This is done so that you do not have to drill through the pattern itself which could get torn up and unusable. Each letter has several studs on the back and each of them are shown on the pattern as cross hairs. Punch through the pattern to the wall a small hole and then mark through the pattern with a sharpie so you can see it. When later removing the pattern, roll it up making sure each hole location is marked, add extra paint if needed.
Using a drill bit slightly larger than the stud diameter, drill every hole to the depth required by the studs. Now the fun part. Take each letter and screw the studs in the back, dry fit to the hole patterns and adjust if needed. Studs should slip into the holes without force. Now, fill the holes and coat the studs with your favorite glue, liquid nails, silicon caulk, epoxy or even mortar can be used. Push the letter studs into the holes until they hit the wall or spacers if used. Move on to the next letter until all letters are installed. Congrats! you can now call yourself a sign installer.
Rail Mounting for Metal (and other) buildings
Rails are typically used on metal corrugated buildings but there are other uses. Most of the work is done on the ground and the letters come to you ready to be assembled to the rails. You can order the rails as natural aluminum finish or painted. If painted, it's best to use the same color as the building which can be specified as a pantone number which we will mix for you. With metal ribbed buildings you will be securing the rail(s) to the building at each rib using your own self tapping screws. We only supply the screws to attach the letters to the rails. Most importantly you will need to establish a level line across the ribs to which you will mount one of many sets of rails with letters attached. It's sorta like laying out track for a train set.
Stand Up letters (advanced)
Before you consider this type of mount outdoors you have several things to consider.
- Check the mounting surface. Is it secure? Is it Solid? Will screws and bolts go in securely?
- Check the Wind Zone. Is the position susceptible to high winds?
- Do you have permission. Is a landlord involved? Do you need a permit??
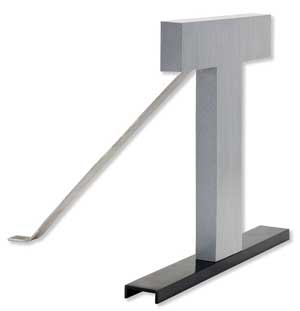
In nearly every case, if your letters are 8 inch or taller, you will need tie backs. While we don't supply them they are readily available at most hardware stores and can be purchased in various lengths or modified in the field to your specs. Mounting is usually done with a bottom rail, angle bracket or bottom stud and the Tie-Back(s) prevent the letters from moving in the wind which would eventually cause failure at the base of the letter due to metal fatigue. Tie-backs are essential in both metal and plastic installs where letters will be mounted by their base. They will prevent you getting sued in the event of failure and damage to persons or property.


